Tools & Equipment · Power Tools
iCrimp PEX Crimping Tool Kit Review: Cinch, Clamps and Removal Tool
A practical look at the iCrimp PEX crimping tool kit: how the cinch-and-removal tool works, included clamps, the difference between cinch clamps, copper rings and expansion systems, and who should buy it.
Affiliate disclosure: PetecGlobalMarket is a participant in the Amazon Associates Program. If you buy through the product link in this review, I may earn a commission at no extra cost to you.
Introduction
PEX tubing can make a small plumbing project easier to route, but the flexible pipe is only part of the system. The fitting, retaining clamp and installation tool must all work together. The iCrimp PEX crimping tool kit brings a cinch-and-removal tool, cutter and an assortment of stainless-steel clamps into one case for people making compatible clamp connections.
This is a review of the listed kit, not a claim that we have installed it or pressure-tested its joints. We checked the supplied Amazon listing and iCrimp information for related cinch tools, then explain what is confirmed, what should be checked before purchase and where a different PEX tool is necessary.
Product Overview
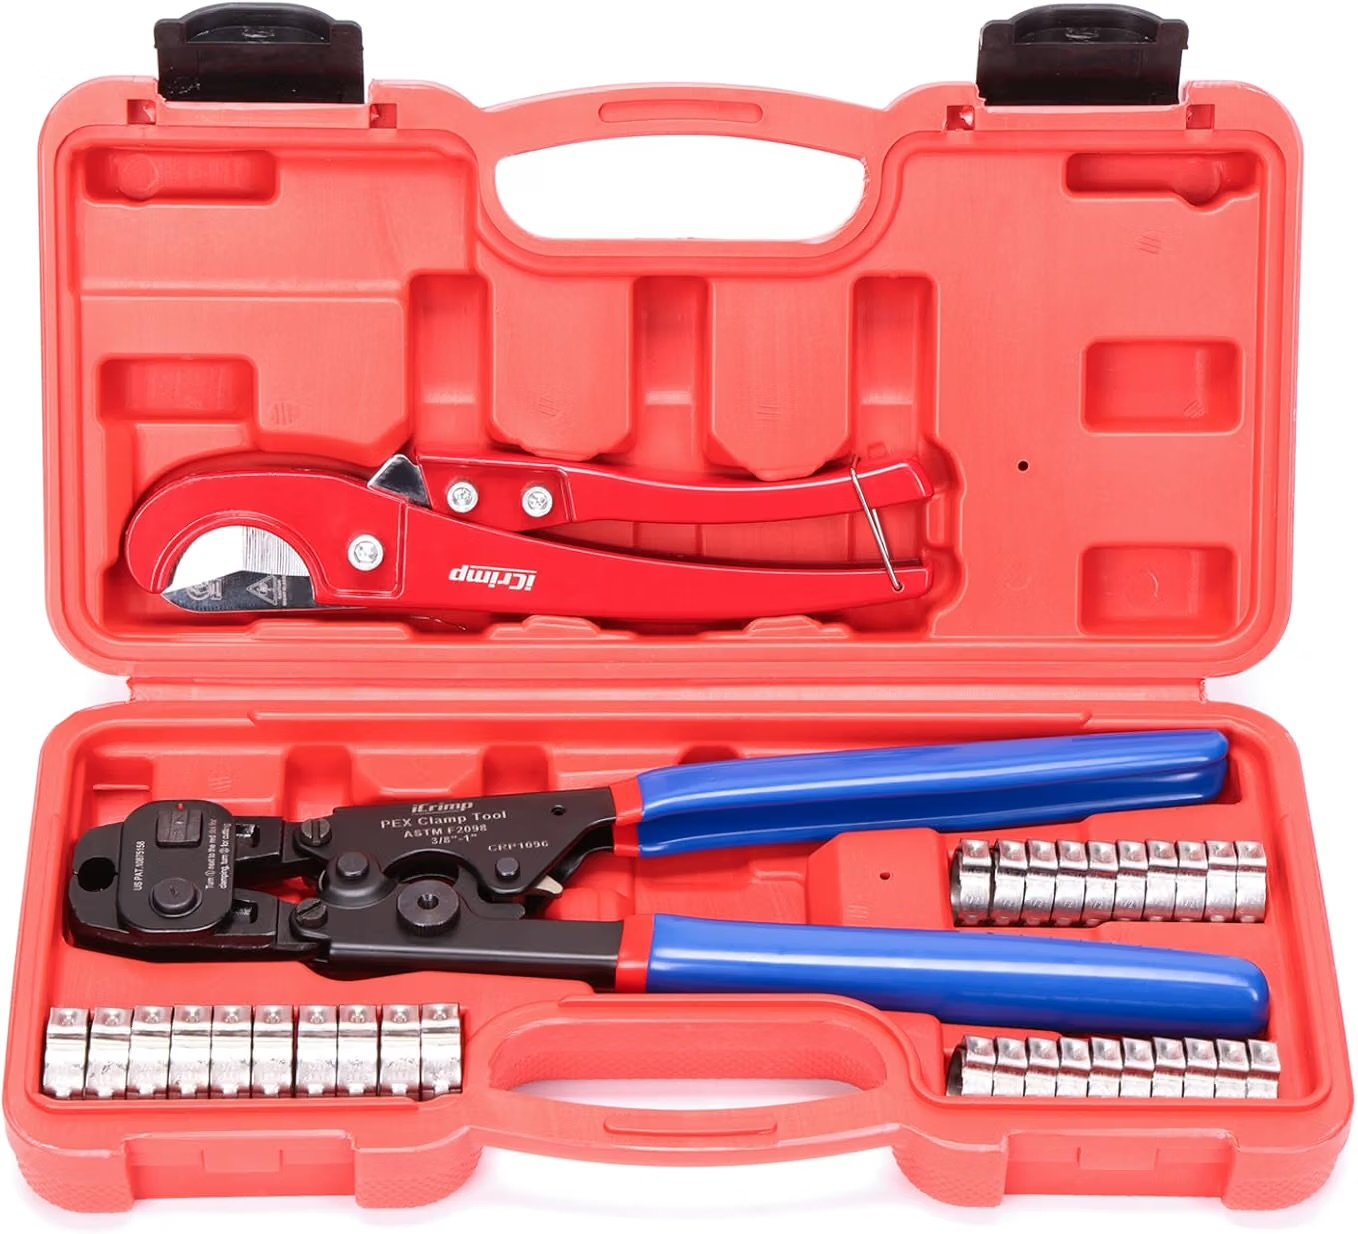
The requested product is the iCrimp PEX Crimping Tool Kit with Clamps, Cinch and Removal Tool for 3/8-Inch to 1-Inch. The selected Amazon listing describes a two-in-one cinch-and-removal tool, PEX tubing cutter, twenty 1/2-inch clamps and ten 3/4-inch clamps in a boxed kit. The supplied image shows the blue-handled tool, red cutter, clamps and case. Check the selected option before buying because related listings offer different bundles.
The tool is advertised for compatible stainless-steel PEX cinch clamps from 3/8 to 1 inch. That describes tool capability, not the sizes of every clamp included in the box. The selected listing names only 1/2-inch and 3/4-inch clamps in its count. If your project uses another size, obtain compatible clamps separately and confirm the pipe, fitting and clamp are approved as a system.
Key Features
A ratcheting cinch tool
A stainless cinch clamp has a raised ear. The tool grips and compresses that ear, tightening the band around PEX tubing over a compatible barbed fitting. The Amazon listing describes a ratcheting, self-releasing mechanism and says the tool arrives factory-adjusted. That design can help the operator complete a cycle without changing jaws for each listed clamp size, but it does not remove the need to check positioning, fit and the manufacturer’s acceptance criteria.
The seller says the tool meets ASTM F2098 for the relevant stainless clamp system. Treat that as the seller’s claim, not independent certification of every fitting, pipe or finished joint. Verify markings, instructions and applicable local approvals for the components you select. Ratchet release alone is not a substitute for a proper inspection and pressure test.
Removal function and pipe cutter
The same tool is described as switching between cinching and removing clamps. Its removal function is intended to help take off a clamp so a fitting can potentially be recovered. Remove pressure and drain the line first, follow the tool instructions and protect the tubing and fitting from damage. Do not reuse a removed or deformed clamp; use a new approved clamp for the replacement connection.
The separate cutter helps prepare a clean, square tube end. That matters because an angled, crushed or damaged end can prevent proper seating on the fitting. Inspect the cutter blade and follow its instructions. The kit is not a guarantee that every tube material or diameter can be cut; check the cutter’s own rating.
Included clamps and storage
The selected Amazon kit specifies twenty 1/2-inch and ten 3/4-inch PEX clamps. Those are useful starting quantities for common work, not a complete supply for every project. Count the joints, allow for practice and rework, and match each clamp to the nominal tube size and system requirements. The case keeps the tool and clamps together and helps avoid loose sharp metal parts in a toolbox.
Detailed Specifications
| Specification | Listing information and qualification |
|---|---|
| Product | iCrimp PEX cinch and removal kit, boxed selection |
| Tool application | Stainless-steel PEX cinch clamps, advertised 3/8-inch to 1-inch |
| Included clamps | 20 × 1/2-inch and 10 × 3/4-inch, per selected listing |
| Tool functions | Cinch and clamp removal in one tool, per listing |
| Cutter | Separate PEX tubing cutter, per listing |
| Mechanism | Ratcheting, self-release; seller describes factory adjustment |
| Standard claim | Seller states ASTM F2098; system compatibility and local approvals still need verification |
| Storage | Case shown and specified for boxed variant |
| Pipe, fittings and additional clamp sizes | Not assumed included; confirm selected bundle |
| Warranty | Not independently verified for the exact selected kit |
Cinch Clamps, Copper Rings and Expansion: Not Interchangeable
Three common PEX connection approaches look similar once installed but use different tools and components. A stainless-steel cinch clamp tightens when a purpose-made tool compresses its raised ear. A copper crimp ring is compressed around its circumference by a correctly sized copper-ring crimp tool and usually checked using the system’s specified gauge. A PEX expansion system uses compatible tubing and expansion fittings, a matching expansion sleeve and an expansion tool.
This iCrimp kit is for compatible stainless cinch clamps. Do not use it to crimp copper rings or expand tubing, and do not substitute an expansion tool or copper-ring jaw for a cinch clamp. Pipe type alone does not authorize an arbitrary combination: check the tube, fitting, clamp, tool, standard and local code together. If you cannot identify an existing connection, stop and ask a qualified plumber.
Design and Build Quality
The tool pictured has long blue grips and a metal working head. Amazon describes forged steel construction. Leverage and a ratchet may be helpful for repeated clamps, but long handles still need room to open and close. A joint directly against a wall or deep in a cabinet can be difficult even when the tool is rated for its nominal size.
We have not measured the tool’s jaw dimensions, calibration, operating force or life. Before use, check for a damaged jaw, loose hardware, worn release or broken cutter blade. Follow the manufacturer’s checks and service instructions; factory adjustment is not evidence that a dropped or worn tool remains accurate indefinitely.
Performance and Ease of Use
On paper the main convenience is one cinch head for several supported clamp sizes and a separate cutter in the same box. This simplifies an occasional installation where the selected clamp system is already known. It does not simplify the planning step: the user still needs enough access to squarely engage the ear and complete the handle cycle.
Practice on spare, compatible tubing and fittings before tackling a concealed connection. If the jaws slip, the clamp sits outside the manufacturer’s position range, or the tool will not complete its cycle, do not cover the joint. Remove the failed connection safely and remake it with new approved parts. We cannot claim a measured leak rate or compare actual operating effort without testing.
Typical PEX Cinch Installation Steps
- Plan the connection according to local code and the pipe, fitting and clamp manufacturers’ instructions. Shut off water, relieve pressure and drain the affected line.
- Inspect the tubing and cut it square with a suitable cutter. Remove damaged sections and keep the pipe end clean.
- Slide a new, correctly sized stainless cinch clamp onto the tubing. Push the approved fitting fully into the tube as its manufacturer specifies.
- Position the clamp at the distance required by the specific fitting and clamp instructions. Do not guess or place it over an unsupported section of tubing.
- Place the cinch jaws squarely on the clamp ear and complete the tool’s specified ratchet cycle. Keep fingers clear and avoid twisting the assembly.
- Inspect the connection using the system instructions. Pressure-test and check for leaks as required before closing walls or restoring normal service. If anything fails inspection, depressurize and remake the connection using a new clamp.
These are general orientation steps, not a substitute for the installation instructions supplied with your exact components. Fitting insertion depth, clamp placement, inspection and testing requirements can vary. Follow the more specific manufacturer and local authority requirements.
Real-World Applications
A homeowner might use a compatible cinch system when replacing a short accessible PEX section or adding an approved branch line. A maintenance professional might keep a portable kit for occasional repairs. In both cases, the most important questions are whether the existing pipe and fittings permit this connection method, whether the intended work is allowed locally, and whether the finished joint can be inspected and tested.
For a concealed repair, plan access and pressure testing before starting. Check hot-water ratings, freeze protection, supports and separation from heat sources according to the system instructions. A clamp tool cannot make a damaged fitting, unsupported pipe or incompatible component safe.
Pros and Cons
- Pros: The listed two-in-one tool can cinch and remove compatible clamps.
- Pros: Cutter, two common clamp sizes and a case are included in the selected boxed listing.
- Pros: One advertised tool range covers 3/8-inch to 1-inch compatible stainless clamps.
- Cons: Only 1/2-inch and 3/4-inch clamps are listed in the selected bundle; other sizes require compatible supplies.
- Cons: It does not replace tools for copper crimp rings or expansion systems.
- Cons: Tight spaces may limit handle movement; completed joints still require inspection and pressure testing.
- Cons: Durability, calibration and actual leak performance were not independently tested.
Maintenance Guide
Wipe the cinch head and cutter after work and dry them before returning them to the case. Remove debris from jaws, inspect the clamp-contact surfaces for damage, and check the handles and ratchet for looseness or unusual operation. Inspect the cutter blade for nicks and replace it only as the manufacturer directs. Protect hands from sharp edges.
Keep clamps clean and dry, separated by size, and store the kit where it will not be crushed or exposed to corrosive chemicals. Follow the manufacturer’s lubrication and calibration guidance; do not change adjustments by guesswork. If the tool is dropped, fails its prescribed check or will not release correctly, take it out of service until evaluated.
Safety Tips
Shut off the supply, relieve pressure and drain the line before cutting or removing a clamp. Hot water can scald; let the system cool. Wear eye protection, keep fingers away from jaws and blades, and protect nearby electrical equipment from water. Never cut a pressurized line or reuse a damaged clamp. Follow local plumbing rules and seek a qualified plumber for uncertain, concealed or safety-critical work.
Why Buy It? A Practical Buying Guide
The kit is attractive if your project specifies stainless-steel cinch clamps and you want the clamp tool, cutter and starting clamps together. Before ordering, identify the actual connection system, pipe size, fitting approval and required standard. Confirm the box option, clamp count, cutter rating, availability of replacement clamps, manufacturer support and whether there is room to move the handles.
For 3/8-inch or 1-inch projects, verify compatible clamps are available separately; those sizes are in the advertised tool range but not the stated included quantities. If a system calls for copper rings or expansion sleeves, buy the correct system-specific tool instead. Compare total project costs, not only the tool kit.
Comparison Table
| Product | Connection method / package | Important distinction |
|---|---|---|
| iCrimp boxed cinch and removal kit | Stainless cinch; cutter and 1/2-inch and 3/4-inch clamps listed | Check selected kit and system compatibility |
| SHALL PEX cinch tool and cutter kit | Listing describes 3/8-inch to 1-inch stainless clamps, cutter and storage bag | Verify clamp count and component compatibility |
| OURU PEX cinch and removal kit | Listing describes cinch/removal tool, cutter and stainless clamps | Confirm selected bundle and approved clamp system |
| iCrimp IWS-1807CN copper ring kit | Listed for 1/2-inch and 3/4-inch copper crimp rings | Different connection method; not a stainless-cinch substitute |
These are different tools and package descriptions, not independently tested competitors. The copper-ring kit is included to illustrate a genuine alternative method, not interchangeability. Verify current listing details, approvals and sizing before selecting a system.
Who Should Buy This Product?
A capable DIYer or maintenance worker who has confirmed a compatible stainless-clamp system and needs a portable kit for accessible jobs may find this a useful starting point. The bundled cutter and two clamp sizes can reduce separate purchases when they match the project. Training, inspection and local approval still matter.
Who May Want to Consider Another Option?
Choose the correct copper-ring or expansion tool when the approved system specifies that method. A professional making many joints in very restricted spaces may prefer a tool designed and approved for those clearances. If you cannot identify the existing system or cannot safely isolate and test the line, hire a qualified plumber rather than treating the kit as a shortcut.
Frequently Asked Questions
Can this tool install copper PEX crimp rings?
No. It is described for compatible stainless-steel cinch clamps. Copper rings require the appropriate ring crimp tool and the system’s specified verification method.
Does it work with PEX expansion fittings?
It is not an expansion tool. Use the manufacturer-approved expansion tool, tubing, sleeve and fittings for an expansion system.
Are 3/8-inch and 1-inch clamps included?
The selected listing advertises tool capability from 3/8 to 1 inch but names twenty 1/2-inch and ten 3/4-inch clamps in the package. Check the selected offer and buy other compatible sizes separately.
Can I reuse a clamp after removing it?
Do not reuse a removed or deformed clamp. The removal function may allow recovery of an undamaged fitting, but inspect it and follow the fitting manufacturer’s instructions before reuse.
Does ratchet release mean the joint cannot leak?
No. A completed cycle is only one part of a proper installation. Inspect placement and assembly, and test the system according to the applicable instructions and local requirements.
Final Verdict
The iCrimp PEX crimping tool kit gathers the essentials for compatible stainless cinch-clamp work into one portable package. The two-in-one removal feature, cutter and starter clamps make a practical case for occasional accessible repairs, provided the selected connection system matches. It cannot replace a copper-ring crimper or expansion tool, and a neat-looking cinch still needs proper inspection and testing. Confirm the kit variant, local requirements and exact pipe-and-fitting compatibility before buying.
Sources checked: supplied Amazon boxed-kit listing, iCrimp’s related cinch-clamp product information and the named alternative listings. Standard and construction statements are seller claims; no independent performance or certification test was performed.
Ready to check current pricing?
As an Amazon Associate I earn from qualifying purchases.
Check Price on Amazon