Tools & Equipment · Power Tools
Haisstronica HS-8327 Crimping Tool Review: Is It Worth Buying?
A practical look at the Haisstronica HS-8327 ratcheting crimping tool for heat-shrink connectors: full-cycle ratchet, advertised AWG range, an unresolved gauge discrepancy, crimping steps, alternatives, and who should buy it.
Affiliate disclosure: PetecGlobalMarket is a participant in the Amazon Associates Program. If you buy through the product link in this review, I may earn a commission at no extra cost to you.
Introduction
A loose connector can turn a simple trailer-light repair into an afternoon of chasing an intermittent fault. Good wiring starts with compatible parts and careful preparation, but the tool that compresses the terminal matters too. The Haisstronica HS-8327 crimping tool is a ratcheting hand tool aimed at heat-shrink insulated connectors used in automotive, marine and similar wiring work.
Is it a sensible addition to your toolbox? That depends on which terminals you actually use. This review is based on the linked product listing, the supplied photograph and manufacturer information for a related Haisstronica heat-shrink tool—not hands-on or independent testing. We explain what the tool is intended to do, where its limits begin and how to check the fit before ordering.
Product Overview
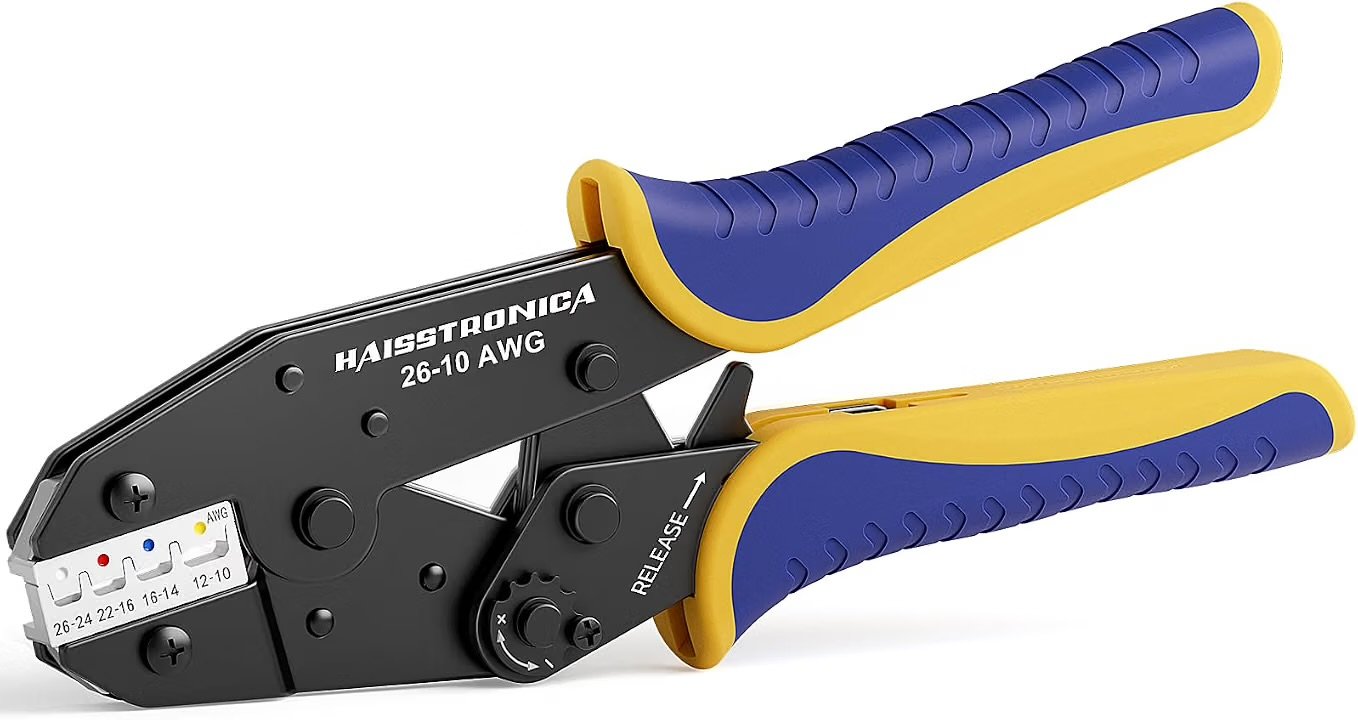
The specified product is the Haisstronica Crimping Tool for Heat Shrink Connectors, AWG 26-10, HS-8327. Its listing describes a full-cycle ratchet, adjustable star wheel, quick-release mechanism and comfortable grip. The supplied photograph shows a dark metal frame, marked jaw positions and blue-and-yellow handles. This is a manual crimper, not a powered device or a wire stripper.
The linked listing advertises 26–10 AWG; the pictured jaws include a 26–24 marking. A manufacturer page for a similar heat-shrink model describes 22–10 AWG instead, so confirm the exact HS-8327 jaw markings and compatible terminals on the selected listing, especially for the smallest conductors. Do not infer that every connector in that numerical range is suitable.
Key Features
Full-cycle ratchet and release
A ratchet advances as you squeeze and is designed to release at the end of its cycle. That can help make repeated crimps more consistent than stopping whenever a pair of ordinary pliers feels tight. It does not know whether the wire is fully inserted or whether the terminal is in the right cavity. The quick release lets you open the jaws if something is misaligned; do not treat a prematurely released crimp as finished.
The listing also identifies an adjustable star wheel. Follow the tool instructions when checking or adjusting pressure, and test representative connections rather than assuming a tighter setting is always better. Excess compression can damage the barrel or insulation just as an incomplete squeeze can leave a loose connection.
Heat-shrink terminal profile and marked cavities
Heat-shrink terminals have a metal barrel inside a sleeve. A suitable die compresses the barrel while limiting damage to the sleeve. The tool is intended for compatible heat-shrink connectors, not automatically for bare lugs, ferrules, open-barrel contacts or every other insulated terminal. Check the connector manufacturer’s specified die profile and conductor range before deciding it fits.
Jaw colors are convenient guides, not universal engineering standards. A red, blue or yellow terminal from one supplier is not proof that it matches a particular nest. Match the actual conductor size and terminal specification first; use the die markings to select the correct position.
Handle shape and grip
The blue-and-yellow handles have textured contact areas, and Amazon describes a nylon grip. That shape may help you keep control during repeated work, but comfort depends on hand size, leverage and how many crimps you make. The larger ratcheting frame also needs space to open, which can matter when the connection is tucked behind a dashboard.
Detailed Specifications
| Specification | What we can establish |
|---|---|
| Product | Haisstronica HS-8327 heat-shrink connector crimping tool |
| Advertised range | 26–10 AWG on linked Amazon listing; verify specific connector and die |
| Manufacturer comparison | Related Haisstronica heat-shrink listing states 22–10 AWG; model/variant must be checked |
| Mechanism | Full-cycle ratchet with quick release, per listing |
| Adjustment | Adjustable star wheel, per listing |
| Grip | Textured blue/yellow handles; nylon listed |
| Connection type | Compatible heat-shrink insulated terminals; not all terminal families |
| Package | Selected offer is a crimping tool; verify bundles and accessories |
| Warranty | Confirm current terms with seller; not independently verified for this exact offer |
Design and Build Quality
The photograph shows a metal crimping frame with a release lever and a pressure-adjustment wheel. Those are useful design details because the working parts are visible and the jaws are marked. They do not prove how long the mechanism will last. We have not measured jaw alignment, crimp height or wear, and we cannot predict durability from a photograph or a seller claim.
Inspect the actual tool when it arrives: jaws should close squarely, markings should be readable and the handles should have no obvious cracks. Check that the ratchet completes its cycle and releases as instructed. Ask the seller about service and returns before relying on the tool for a critical job.
Performance and Ease of Use
The ratchet is most useful when the same style and size of connector comes up repeatedly. You still need enough room to position the tool squarely, hold the wire in place and complete the handle stroke. For a single awkward repair inside a vehicle, access may matter more than the number of jaw sizes. If you cannot see the barrel or complete the stroke, reposition the work or choose a tool approved for that space.
Do a practice crimp on the same wire and terminal combination before making a repair. Inspect the sleeve and conductor, and use the connector maker’s acceptance criteria. A gentle pull check may reveal an obviously loose wire but is not a substitute for the specified pull-force test or a professional inspection.
How to Make a Proper Crimp
- Isolate the circuit and verify it is de-energized with an appropriately rated tester and procedure. For vehicles, follow the manufacturer’s battery-disconnection instructions.
- Identify wire gauge, conductor material and connector rating. Select a heat-shrink terminal approved for the wire and application, then match its barrel to the correct die cavity.
- Strip the length specified by the terminal manufacturer without nicking or cutting strands. If strands are damaged, cut back and strip again.
- Place the barrel in the appropriate cavity as the terminal instructions direct. Insert the conductor fully to the specified depth; do not trap insulation under a conductor-only crimp.
- Keep the wire and terminal aligned and squeeze until the full ratchet cycle releases. Inspect for correct position, damaged insulation and exposed strands; follow the connector maker’s test procedure.
- After the mechanical crimp is accepted, apply controlled heat according to the connector instructions. Protect nearby insulation and let the joint cool before moving it.
Why be fussy about size? A barrel too large for the wire may not compress the conductor properly. A barrel too small can force strands out or prevent full insertion. Either can create a connection that looks finished but is unreliable. Heat-shrink tubing protects an already sound connection; it cannot fix an incorrect crimp.
When a terminal will see vibration, plan strain relief as well as the crimp itself. Support the cable so movement is not concentrated at the barrel, keep the joint clear of sharp edges, and protect it from abrasion. In a moist location, verify that both the connector and its sealing method are specified for the environment. An adhesive-lined sleeve needs appropriate heat and surface preparation; a sleeve that looks closed is not proof that water cannot enter along damaged insulation.
If you encounter green corrosion, brittle insulation or a conductor that has already lost strands, simply squeezing a new terminal over the damaged end is not a sound repair. Trace the damage back to clean material and follow the equipment maker’s repair instructions. For a short remaining wire, use an approved repair method rather than stretching it to reach. These small preparation decisions are often more consequential than the choice between two similar hand tools.
Real-World Applications
Think of replacing a damaged low-voltage trailer splice, adding a properly fused accessory lead or repairing a disconnected wire on compatible equipment. In each case, choose a terminal and insulation suited to temperature, vibration, moisture and conductor material. A boat repair may require marine-rated materials and corrosion protection; the presence of a heat-shrink sleeve alone does not certify the completed assembly for that environment.
Household mains wiring involves additional code, connector and enclosure requirements. This is not permission to use automotive terminals in a wall box. Consult a qualified electrician when circuit identification, test procedures or local rules are unclear.
Pros and Cons
- Pros: Full-cycle ratchet, pressure adjustment and release support a controlled workflow.
- Pros: Marked jaws and a heat-shrink-oriented profile make the tool focused on common insulated splices.
- Pros: Textured handles and a manual mechanism need no battery.
- Cons: Advertised size range differs from a related manufacturer page; verify the exact variant and smallest terminals.
- Cons: The tool is not a universal die for every terminal, and a stripper, connectors and heat source may be separate.
- Cons: Handle clearance and hand effort can make confined work awkward; service life and crimp quality were not independently tested.
Maintenance Guide
Wipe the jaws and frame after use to remove fragments and dirt. Keep the tool dry, especially after working around water, and inspect jaws for burrs, chips, corrosion or misalignment. Check the ratchet and release for smooth movement. Follow the manufacturer’s maintenance instructions and use lubricant sparingly on pivots only if recommended; avoid contaminating terminals or insulating sleeves.
Store it in a dry toolbox with the jaws protected from impacts. Do not use it as a hammer or bend the handles for leverage. If a test crimp fails or the mechanism is damaged, stop using it and consult the manufacturer rather than guessing at an adjustment.
Safety Tips
De-energize, secure against reconnection and verify absence of voltage with suitable equipment before touching conductors. Wear eye protection, keep fingers clear of the jaws and avoid loose clothing near moving parts. Use a purpose-made heat gun in a ventilated area; protect fuel, solvents and surrounding materials from heat. A textured grip is not a verified electrical insulation rating. For unfamiliar mains or safety-critical circuits, use a qualified professional.
Why Buy It? A Practical Buying Guide
Choose this model if compatible heat-shrink terminals are the main job and you prefer a dedicated ratchet over a multi-die kit. Before buying, list the wire sizes and terminal brands you use, compare their die recommendations with the HS-8327 markings, and check access around the work. Confirm whether you need a separate stripper, heat gun and connectors, and review the exact package and return policy.
Do not buy on the widest advertised AWG range alone. Different connector barrel shapes, conductor types and environmental approvals can matter more. For the 26–24 AWG end in particular, seek written confirmation from the seller and connector supplier because the related manufacturer page describes a narrower range.
Comparison Table
| Product | Intended use / distinction | What to check |
|---|---|---|
| Haisstronica HS-8327 | Dedicated heat-shrink ratchet; listing says 26–10 AWG | Exact connector profile and size, particularly 26–24 AWG |
| Klein Tools 3005CR | Full-cycle ratchet for 10–22 AWG insulated terminals | Whether the terminal maker approves the die for your heat-shrink sleeve |
| Plustool AWG 26–10 heat-shrink crimper | Listing describes a heat-shrink ratcheting crimper | Specific terminal compatibility and current package |
| Haisstronica 6PCS interchangeable terminal die set | Listing describes interchangeable dies and storage | Which dies are included and whether each supports your terminal |
These alternatives are different products, not a ranking or a head-to-head test. Product descriptions can change; check the exact model and selected package. Klein’s 3005CR specification describes insulated terminals generally, so do not assume it is approved for a particular heat-shrink connector.
Who Should Buy This Product?
A DIY vehicle owner, maintenance worker or hobbyist who repeatedly uses compatible heat-shrink terminals may appreciate a dedicated tool and consistent ratchet cycle. It is also sensible if the connector supplier confirms compatibility and you already have the separate stripping and heating equipment.
Who May Want to Consider Another Option?
If your work involves many different terminal families, compare a multi-die set with documented die profiles. For a particularly cramped harness, look for an approved compact tool. A professional working under a connector manufacturer’s tooling specification should use the specified tool and inspection method, rather than substitute on gauge range alone.
Frequently Asked Questions
Is the Haisstronica HS-8327 crimping tool suitable for 26 AWG?
The Amazon listing advertises 26–10 AWG and the supplied photo shows a 26–24 marking. A related manufacturer page states 22–10 AWG, so verify the specific model, wire and terminal before purchasing for the smallest gauge.
Does the ratchet guarantee a good connection?
No. It helps complete a repeatable cycle, but correct terminal, die, wire preparation, positioning and inspection remain essential.
Can it crimp bare or open-barrel terminals?
Do not assume so. This model is marketed for compatible heat-shrink connectors. Use the terminal maker’s specified profile for bare, open-barrel or other contacts.
Do I shrink the sleeve before crimping?
Normally the connector is crimped and inspected first, then heated according to its instructions. Follow the specific connector manufacturer’s sequence and temperature guidance.
Are connectors and a wire stripper included?
The selected listing is for the crimping tool; bundles can differ. Confirm the exact contents before ordering rather than assuming accessories are included.
Final Verdict
The HS-8327 has a clear purpose: help form compatible heat-shrink terminal connections with a full-cycle manual ratchet. Its release lever, adjustable mechanism and marked jaws are useful on paper, especially when the same connectors recur. It is not an all-purpose electrical crimper, and the range discrepancy makes confirmation important for fine wire. If your connector maker approves the profile and you have room to operate it, it is worth considering; if your work spans several terminal systems, compare a documented multi-die kit first.
Sources checked: the supplied Amazon listing for HS-8327, Haisstronica’s related AWG 22–10 heat-shrink crimper page, and Klein Tools’ 3005CR specification. Listing claims and similar-model information are identified above; performance has not been tested.
Ready to check current pricing?
As an Amazon Associate I earn from qualifying purchases.
Check Price on Amazon